When in Doubt Retrofit
Late-production 4R55E and 5R55E piston/damper assemblies aren’t prone to just one type of problem. They can exhibit a number of problems, and it’s easy to become overwhelmed trying to address them all.
For example, the input spline insert may become loose, and it’s not possible to weld the original insert to the plate because of the composition of the insert. You’d have to make an insert from a material that has weld characteristics compatible with the plate, which is no easy matter.

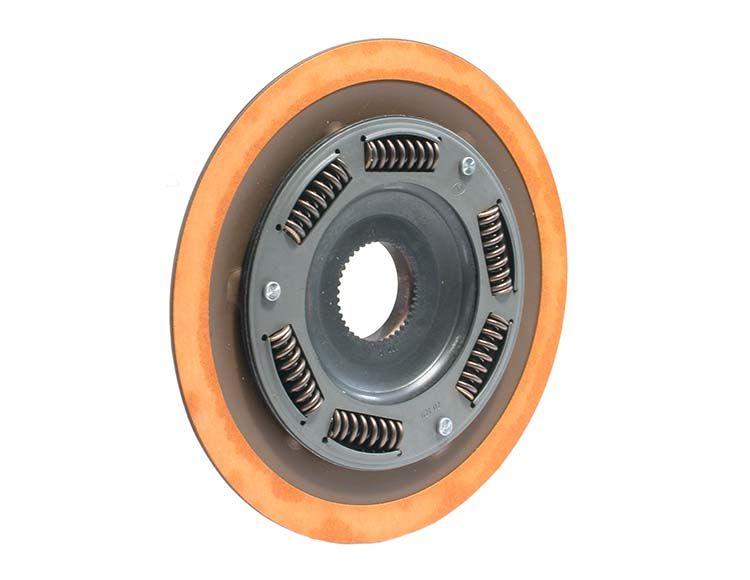
Then, once you’ve addressed the spline insert issue, you still may have to contend with bore wear. The mating surface of the plate and the turbine hub seal (see Figure 1A) is a prime location for bore wear. OK, you can deal with that, right? But once you’ve solved this problem, there are more potential headaches to face before you can say you’re done.
You may be looking at worn-out splines between the damper assembly and the turbine hub (see Figure 1B). Or, you may find excessive clutch release clearance caused by wear on the plate where the plate and its sandwiched shim meet the turbine hub (see Figure 1C).
At this point you may feel like fixing this piston/damper assembly is a lot like trying to capture an animal that has six entrances to its burrow: There’s just no easy way to do it.
There may be better solution: You can retrofit a FD-HT-25HS turbine hub into the turbine and use the FD-DA-7 damper assembly. Start by cutting the original turbine hub out of the turbine. Measure the diameter of the turbine hub where it fits into the turbine, before you set up the turbine in the lathe. Hold the turbine by the hub with the stator side facing the tool post.

Using a good carbide bit, start at the outside of the turbine hub and cut toward the center. Machine in slightly past the diameter of the turbine hub. This will cut away a little more than half of the flat surface. When you have cut most of the turbine hub away, you will see the outside edge of the hub start to curl up. When this happens, your next cut will roll the hub away from the turbine. At this point the hub can easily be separated from the turbine. Deburr the turbine and size the inside bore to fit the replacement hub.
Protect the surface to be welded and spray the remaining area of the turbine with anti-splatter spray. Protecting the area that will be welded from the anti-splatter spray will keep the weld from being contaminated. Hold the replacement hub into the turbine (Figure 2) and weld into place. Your finished product will look like the turbine in Figure 3.
Related Units
Related Parts
Required
Recommended
Required
Recommended
4R55E, 4R55E, 5R55E Late Production, A4LD, A4LD Multi-Plate
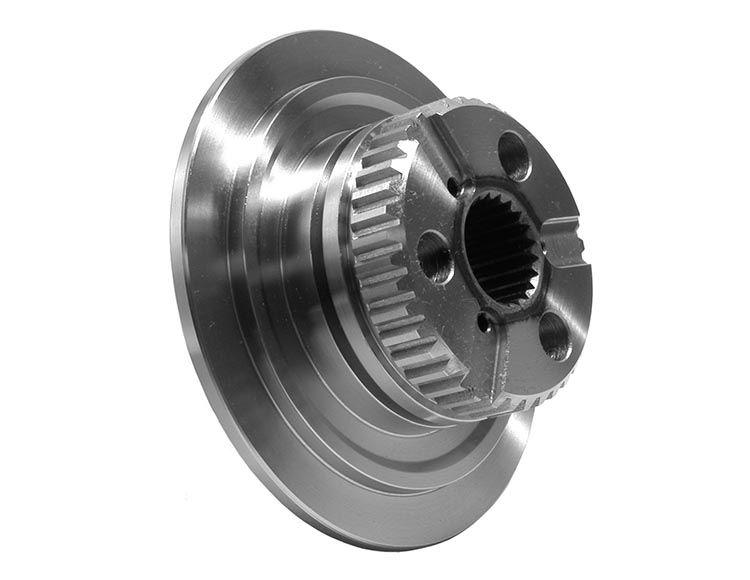
Turbine Hub FD-HT-25HS
- Material: Steel
- Internal Spline Tooth Count: 21
- External Spline Tooth Count: 40
While Sonnax makes every effort to ensure the accuracy of technical articles at time of publication, we assume no liability for inaccuracies or for information which may become outdated or obsolete over time.